Saturday, March 30, 2013

Spring is a Promise

In the northern hemisphere, we are more than ready for spring this year. In Canada, we have had months of snow and cold but it has not been anything like as difficult as it has been in the United Kingdom. Right now, the snow drops are up but have been eaten by the rabbits. Aconites are just through the ground. Hyacinths have their noses up to sniff the air. They are still undecided.

To encourage spring's arrival, here is a spring garden project for you. Look at the garden carefully and see how many of the flowers you are able to recognize. Gardeners have an advantage with this.


Yes, here is a book that tells you how to stitch recognizable spring flowers. Published as an eBook, you can have it in your computer within minutes of reading this. If you are more comfortable with a printed copy, you can print it and put it in a binder. This is a convenient way to acquire it, it is inexpensive and you will be the owner of the first book on embroidery written and published electronically. As such it is a landmark though I expect there will be more embroidery books in the future. For the author especially, and for the publisher, it was a huge technical challenge.

Stitching Idyllic: Spring Flowers uses only four basic stitches: Straight, Detached Chain, Buttonhole and French Knots. But these stitches have been adapted in new ways to achieve the results needed to portray recognizable plants and flowers. Written with a novice stitcher in mind, the section on preparation will tell you how to bond two layers of fabric to make one stable piece of fabric for the background. It explains how to mount the bonded fabric drum tight on a stretcher bars frame. Stranding and mixing thread colours to achieve the correct colour for each specific flower is included. There is also a simple way of planning the layout of your garden as not everyone feels comfortable drawing a design.

What more can you ask? Make this your Easter gift to yourself or for a friend. If I had not written it, I would be buying one for myself.

To see this book and browse the contents, go to www.annbernard.com. If you should then decide to purchase, the directions on how to do so are included.

Monday, March 25, 2013

Royal School of Needlework - Part Two: Let's Step Inside

In early September 1950, the rest of my life started. Having just turned 17, and leaving an unhappy school life behind, I started travelling daily from an outer region of London into Kensington and Prince's Gate.

RSN was housed in a magnificent building which had seen even more grandiose days in the previous century. The central hallway was two stories high, wood panelled, and had an impressively grand staircase and upper landing with a railing along two sides forming a balcony. The room beside the front door was an office. The other two rooms on the ground floor were large and gracious with floor to ceiling french doors or windows that opened onto a stone terrace. Beyond this was a sunken garden with large trees and an immaculate lawn. You can see this hidden garden on Google Maps aerial view; viewing it today makes me wonder, idly, how many other such hidden gardens there are in London.

One floor up, the workroom occupied the front room while the class rooms were in the two elegant rooms overlooking the garden. These rooms all had light coloured panelled walls and parquet floors. New overhead lighting had been installed and we had no trouble stitching anywhere in the rooms though most of us had young eyes. This is where our easels with slate frames stood. The easels were all ancient and finding and keeping a matching pair was a challenge. The cleaners could get them mixed up. There was also a huge high table where our teachers, or us, cut fabric, transferred the design (prick and pounce) and finally mounted it and laced it onto masonite. On the floors above were more class rooms where we learned history, dressmaking, pattern drafting, design, and something called small samplers.

Elegant as all this sounds, let's get down to reality. English society was still full of rules, regulations and restrictions and it never occurred to us (or to me, anyway) to question them. We were not allowed to enter through the front door but instead went down the stairs by the front door to the basement where we left our coats. We were not allowed to enter the front hall or walk on that magnificent stairway but used the steep and narrow servants' staircase instead. You can see this on the left side of the floor plan. It was a long climb to the upper floors. We were not allowed to enter the workroom or talk to the staff. The showroom containing the threads and other supplies was located on the main floor in the larger room at the back. It was off limits except to select thread colours. Mostly, the threads and wools were set and did not require us to make choices. We were absolutely forbidden to set foot on the terrace or go into the garden. Did I feel hard done by? No. This was normal in England at that time and for a long time after, too. No one questioned this that I was aware of. We knew and expected nothing else.

And we started to learn our stitches immediately. We all knew the basic stitches but we had to stitch them perfectly or else they came out. Others were new to us, particularly the composite stitches which contained several stitching stages; I do not think I have used any of them since then. Feeling very virtuous, I stitched small. Not only can I now no longer identify the structure of the stitch but it made me slow with the result that I was the last one in our group of about seven students to complete their work. Being last meant that I had the last choice of background linen fabric for the next sampler and finished with a brilliant pink which I hated and still do. This second sampler was appliqué and on it we learned to stitch accurately and fast. It was a boring project and I think that everyone was glad to complete it. Frankly, it was sufficiently tedious and demanding enough to make anyone but the determined quit on the spot. Having survived that one, we progressed to the crewel work sampler stitched with wool on linen twill. I do not know what the wools we used were. Certainly not Medici. Materials and thread for embroidery still had limited availability but RSN had a stock on hand from prewar days. There seemed to be enough of everything but colour ranges and choices were not always complete. Our teacher, Marguerite Randell, was excellent. She was elderly but eternally patient and always available when you needed assistance. But, she had her standards. Stitching had to be up to that standard, and the best you could do or else it had to come out. Some careful snipping of threads released the offenders but the remainders (called dead stitches) had to be removed in their entirety. I remember clearly, being in a hurry to get on to the next stage and not getting all the thread whiskers out. She sat down and told me this was inadequate. The offenders were quickly removed but it was a very very long time before she came back to show me the next stage. A lesson never forgotten.

Next entry: We continue to stitch, the press comes to call and we meet other students.


Sunday, March 10, 2013

Royal School of Needlework - a Historical Perspective - Part One

Are you curious about what it was like to be student at RSN? I would be if I had not had the good fortune and an accommodating father to pay the bill. Actually, I remain curious to hear about being a student at Hampton Court Palace and hope others with more recent experience will add to this account.

You can Google this address but, for those not familiar with London, Prince's Gate is a terrace off Kensington Road. Crossing the road to the north is Hyde Park with the Serpentine and Rotten Row, a horse and carriage riding route. Connecting Kensington Road to the south is Exhibition Road which leads to South Kensington Underground station. The Victoria and Albert Museum, the Natural History Museum and the Science Museum are all located on Exhibition Road. To the west, you will find the Royal Albert Hall, Imperial College and Kensington Palace, the home of several members of the Royal family. Going east will take you to Knightsbridge and Harrods. I found the history of the development of this area of London to be interesting and hope that you will, too.

In the late 1600s, a gardener named George London and partners established the Brompton Park Nurseries, part of which is now the site of the Victoria and Albert Museum. Influential in garden design and innovative plantings, he nurtured plants and trees brought to him by travellers to other countries. He supplied plants and trees and landscape designs in London, elsewhere in England and in Europe. In the 1700s the neighbouring rural village of Brompton experienced a building boom with an influx of terraced houses and the creation of a busy metropolitan borough. A further building boom in the early 1800s transformed the area into a prosperous residential area. Portions of the nursery garden were appropriated for building.

All this is linked to the Industrial Revolution (1760-1870). Water and steam power and the development of machine tools influenced every aspect of daily life in Britain. Massive population and income growth created the first capitalist economy leading to both great wealth and abject poverty. Steam-powered ships and railways were late developments of the Industrial Revolution

In 1850, Britain decided to celebrate its huge achievement with a Grand Exhibition. The contract was awarded to Joseph Paxton who built a modular style building of cast iron and glass and erected it in the southern part of Hyde Park. Punch, the magazine, dubbed it the Crystal Palace. With so much glass, it needed no electric lighting system but the glass panelling was not watertight and there were widespread leaks in the roof. After the Exhibition closed the Crystal Palace was dismantled and rebuilt in south London where it survived until destroyed by fire in 1936.

Britain had money to spend and Prince Albert, Queen Victoria's husband, proposed that the area south of Hyde Park be developed as an area for enrichment and education. Thus began the founding and building of Exhibition Road, the museums and the Royal Albert Hall. He died in 1861 before seeing the completion of these projects. The Albert Memorial was built in Hyde Park opposite the Royal Albert Hall and commemorates his contribution. Queen Victoria was devastated by his death and went into mourning for the rest of her life.

To move back to Prince's Gate, this area just north of the original Brompton Park Nursery was a market garden growing vegetables and fruit to supply the London area. In the early 1800s, plans were drawn up for a four sided block of rental town houses enclosing a private and ornamental garden. Of necessity, the first buildings were stables and a carriage house. Prince's Gate faces onto a carriage way. This private road was set apart from the the main road and allowed horses and carriages safe access to the front doors of the houses. It is now a convenient place to park your car. Speculative building of houses with four to five storeys over a basement began in the 1840s. This was a large project and took several years to complete. The houses were slow to rent initially and then fell out of favour during the building and use of the Crystal Palace as prospective tenants complained of the loss of their view of Hyde Park and all the traffic and noise created by the Grand Exhibition. NIMBY is nothing new! Gradually, the houses were occupied by the newly rich bankers, industrialists, ship owners and minor aristocracy who wanted smart and convenient town houses in this new and fashionable area of Kensington. Despite interior differences, the facades were similar and Italianate, three windows wide with a porticoed entrance on the ground floor. The stuccoed exteriors were painted white and remain white to this day as you will see in the photograph.


The photo is courtesy of Google Street View and is current; in the 1950s, there were far fewer cars. No. 25 is the first house and entrance beyond the black railing. It is a bit larger than was normal as it is L shaped taking advantage of an indentation in the previously built house on the right of the photo; that building is now a boys' school. No. 25 was occupied by The Royal School of Needlework from 1949 to 1987 when RSN moved to Hampton Court Palace. In the 1990s the whole house was refurbished and restored to a single residence. This area of London is now the location of foreign embassies with several located in Prince's Gate.

British History Online www.british-history.ac.uk provided the information for this précis. Of further interest to stitchers are the designs for the floor and ceilings of these houses to be seen on the British history sites.

Having taken you on a historical tour, my next entry will be about being a student of RSN in this historic house during a time, just five years after the end of WW 2, when London was still bleak and dirty and food was short. But we survived and the RSN experience was certainly an interesting one.

Friday, February 22, 2013

Grip-n-Stitch Embroidery Frames by Fabric Flair

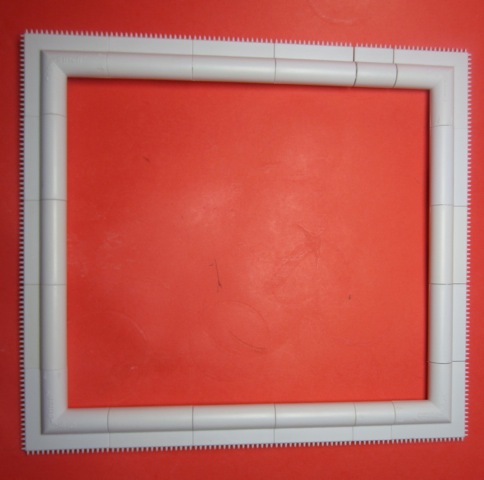
Sharon Boggon purchased a Grip-n-Stitch Frame in Australia in 2012 and wrote a review about it. This new type of embroidery frame sounded like an improvement on other frames on the market and I have been searching for one in Canada. No luck in our stores but Herrschners have them in their online catalogue. The size is 8" x 10" with four small extensions included to enlarge the frame in any direction. For a larger frame it is necessary to purchase two kits.


I tried it out on a piece of cotton fabric (Monaco) by CharlesCraft, 28 count, to which I did not add backing. Currently, I am stitching on dressmaking weight linen to which I have added a light weight backing. As the teeth that secure the fabric are only 1/4" long this is a about the limit to the thickness of the fabric that one can use on this frame. Aida Cloth would probably be OK but I have not tried this.


On the plus side, it is easy to mount the fabric on the frame single handed and the tension on the fabric is maintained well. This maintenance of tension is an improvement on a circular frame even with a wrapped inner ring or a Q Snap Frame. I have now used the Grip-n-Stitch Frame three times and found that it is light and comfortable to use, holds the fabric tension well and is easy and quick to set up. It needs less extra fabric around the outside of the frame than does a Q Snap Frame. As the fabric I was using softened a bit during stitching, removing the protective bars and tightening the fabric was easily and quickly done establishing drum tight fabric tension. I just hate stitching on fabric that moves with every stitch.

When the extra pieces of frame were added to form a square, it was an appropriate frame for stitching a circular design 8” in diameter. Set up as a rectangular frame, the design should be a little smaller than can be drawn on a sheet of computer paper. The whole of your design must fit within the frame. It is not possible to move it to a different part of the design as the teeth damage the fabric and would have a disastrous effect on your embroidery.

Grip-n-Stitch Embroidery Frames are a good idea but a version with longer teeth is needed to hold heavier or thicker fabrics. The cost was $56.00 Canadian which included shipping and taxes. I am including the link to Sharon's review which includes more photographs. I have not been asked to write this review and purchased my frame from a commercial supplier.

Sharon Boggon also uses this frame for Crazy Quilting and reviewed it on February 20, 2013 and August 22, 2012:pintangle.com


Fabric Flair Associated Products can be found at:www.fabricflair.com


Friday, February 1, 2013

Satin Stitch - Padded, Shaded and Stitch Rotated

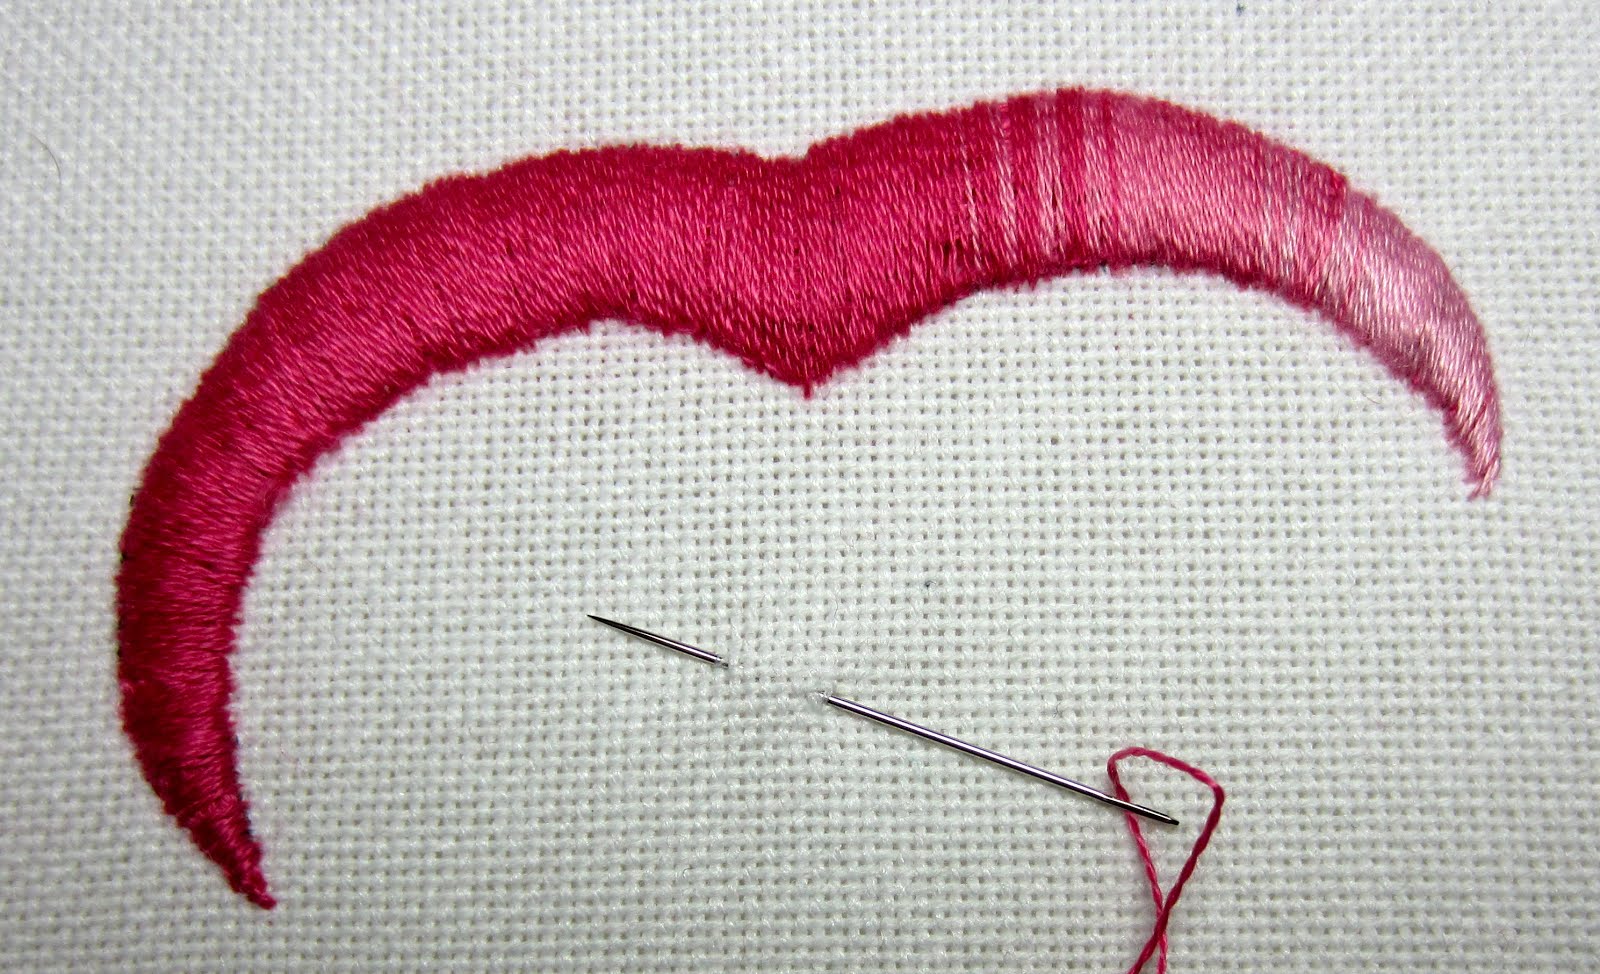
As I wished to include all the above features in this Tutorial, my design motif is unbalanced right and left sides. It is 3" across and 1/2" wide. This width is about as long as it is feasible to make Satin Stitches without them becoming unstable. 1/8" is about the narrowest or else it is too pokey.

The fabric I used is 28 count cotton Monaco by Charlescraft. The higher the thread count the easier it is to work this stitch and the result is better, too. I mounted it on a Grip-n-Stitch frame by Fabric Flair and am reviewing this new type of frame in a separate entry. It is essential that the fabric be really taut and mounted grain perfect when undertaking Satin Stitch.

1. Draw the shape on the linen, in this case it is cotton, using a pen that will make a very fine line.

2. I used DMC Floss and chose a range of thread colours that were close in shade. It is much harder to shade when there is a marked difference between the threads.

If the final layer of Satin Stitch is to be a silk thread, I would still use DMC Floss for padding for reasons of economy.

Preparation is vitally important
Unless this is perfect, the appearance of your final stage of Satin Stitching will not turn out as you had hoped. Do not short change yourself on this.

3. Using three threads of the floss, split stitch all round the motif on the marked line. As Mary Corbet has said, using two threads means that they divide when split stitched instead of behaving as split stitching. These stitches must be small i.e. 1/4" in length. Start and finish threads within the body of the motif. This outline needs to be as solid and immovable as the Great Wall of China. After just a few stitches, test this by going picky, picky with a finger nail to see that the line is solid and immovable. Reduce your stitch size if there is any give in this line of stitching.

4. Padding
All Satin Stitched projects need at least one layer of padding which is usually worked in long Split Stitches within the shape. This padding should cover all the space within the the outline. It will support the Satin Stitches and prevents them from collapsing into the middle of space. Totally unpadded Satin Stitch has a 'hollow' look to it.

Padded Satin Stitch has a raised look and needs three or more layers of padding stitches.
Use six strands of Floss for this. The first line is lengthwise. Note that it does not extend to the outline leaving a space. The second line is stitched crosswise. I used the palest of the colours so that this would be visible for you. Normally, I would use the same colour as the other layers. The third layer is also lengthwise and fills the entire space within the outline. Take the shortest route between padding stitches so that the reverse side does not also become padded,

Organize the padding layers so that the final one lies in the opposite direction to the Satin Stitches.

5. Satin Stitching
Make a decision on which edge of your stitched shape will be more noticeable. This is usually the outer edge of the petal of a flower or the edge which is better lit for the viewer. This is the dominant edge and the one that the needle goes down through the fabric.

The needle will come up on the less visibly noticeable edge which is usually towards the centre of the flower. Use one strand of thread only.

This may seem like an unnecessary amount of stitching but is quicker in the long term.
Two threads, or even three threads will twist and will not give attractive or professional results.
Try stitching with two threads just for the experience. You will find that you will have to separate those threads every stitch and it will make it slow. Slow and frustrating, actually.
One thread is the quick and easy way to go.
Also use the smallest needle you can manage to thread such as a Crewel size 9 or 10. This will help the ease and accuracy of the stitching though some Crewel 9 or 10 can be hard to thread. Bohin needles do not have this problem. The eyes are properly formed and much easier to thread.

Start with a knot (or not) and make a small waste stitch within the body of the padding.

In the centre of the motif bring the needle to the front on the less dominant side of the motif. Take it down to the back on the dominant side of the motif.

This is when your preparation will pay you dividends in ease of stitching and results.
Let the needle find the spot that is closest to that Great Wall of China and make sure that it goes through the fabric absolutely vertically.

And this, my fellow stitchers, is the secret to perfect Satin Stitch. Excellent preparation, stitch with one thread only and make sure that your needle entry and exit is always vertical.

If it is a straight shape, just continue until you reach the other end.

Shading
Shading is a question of getting organized as you move from one shade to the next. Thread another Crewel 9 or 10 needle with one thread of the next colour. Look at the photos to see how the colour change is achieved.
One stitch on the new colour, three of the old,
two stitches of the new, three of the old,
two stitches of the new, two of the old,
three stitches of the new, one of the old,
and then you will likely be ready to use all of the new colour.
These ratios are changeable as appropriate for your project.

Continue stitching maintaining the vertical and parallel orientation to the stitching, changing colours to achieve the shading you wish until you reach the end or the pointed end of the motif. I seem to have lost some of that perfect angling but you will not do that I am sure.

6. Points
If possible, organize your design motif and stitching plan so that the stitches at the point retain their vertical orientation. This creates a far more satisfactory result than trying to place tiny and short stitches across the point. There is nothing like a photo enlargement to show imperfections.

7. Rotating Satin Stitching
That means stitch direction which follows the curve of the motif. As you can see, in this shape, if the stitches remained vertical and parallel, they would become rather longer than the practical maximum of approximately 1/2". However, the stitches are remaining at right angles to the outer edge of the motif. The dominant outer curve is also considerable longer than the inner curve.

Here is how
Watch the shape and make an extra stitch every so often so that there are more stitches going down into the fabric on the outer edge than there are on the inner curve. Come up through the padding about halfway across the width of the motif and then go down on the outside edge as usual. The next stitch will be a normal stitch that covers the whole width of the motif. This second stitch will cover the start of the shorter stitch making it undetectable. That half way point can instead be 1/3 or 2/3 of the way across the width. This depends on the shape and curve of the motif.

Watch the shape and the stitch angles and add these extra stitches as needed but always have about three normal stitches between the shortened ones. I apologize for missing taking a photos of this and I am not computer literate enough to add an arrow as an indicator. I am also regretful that the photos are dark on one side.

The point at this end had to be stitched across with several really tiny stitches. I would have been wiser to continue the shape of this half of the motif in a gentle curve to the right which would then have let me finish it with longer stitches like the other end of the motif.

Leaf Shape with one layer of padding

This leaf is stitched in Perle 5.

1. Plan the shape and the stitch direction making sure that you will be able to complete both the rounded end and the point easily.
2. Split stitch on the line around the leaf using one thread of Perle 5 and ensuring that this line is solid and immovable (Great Wall of China). Use an appropriate sized Crewel needle which is the thinnest you are able to thread.
3. Using two threads of Perle 5, place long split stitches in the opposite direction to the planned Satin Stitch and fill the entire space within the leaf.

4. Decide on the designated primary and more visible edge of the leaf and arrange that your needle enter the fabric on that edge and come up through the fabric on the secondary edge. Remember to let the needle find the spot closest to the split stitch edging and that the needle enters and leaves the fabric at exact right angles to the fabric.

Start Satin Stitching in the centre and widest part of the leaf shape placing the stitches at right angles to the padding stitches. This is as you planned in the diagram.
Work towards the base of the leaf first making sure that the final stitch that completes the curve is short in length. This final stitch supports the previous longer one and prevents it 'falling off the curve'.

5. Continue vertically placed Satin Stitching until you reach the pointed tip. Place the final shortish stitch so that it forms the point. Take the needle down very close the the previous stitch so that this last entry point is not visible.

Padded Satin Stitch Small Circle

6. For a small shape, use three threads of DMC Floss to split stitch the outer line.
Use six threads of Floss to form a Double Cross Stitch or Quadruple Cross for the padding.

7. It is your choice to Satin Stitch with one thread of either DMC Floss or Perle 5.
Some circles, such as berries, become too small for the Perle 5 thread. Try Perle 8.

My circle is definitely not round. If you wish for an exact circle, use a template as suggested by Mary Corbet.

This completes this Tutorial.

Hope that you will enjoy and have success with Padded Satin Stitch.


Tuesday, January 22, 2013

Royal School of Needlework - Third Sampler - Applique and Couching

This piece was a pain to stitch. For starters, I did not like that hot pink linen fabric then and I continue to dislike it. It was the project where we learned, because we had to, how to stitch accurately and quickly.

The design was transferred onto the cream fabric by the prick, pounce and paint a very thin line with black water colour paint method. The pink and the cream fabric were both mounted onto a slate frame and the cream fabric was thoroughly basted in place.   Starting somewhere, probably near the base of the stem, small running stitches were made on the design lines along a small section. The fabric was trimmed away very close to the marked and stitched line. The couched thread was either 12 or 18 strands of DMC Floss (deliberately left slightly puffy) couched down with three threads. Whatever your spacing was between the first two stitches was what it had to be consistently throughout no matter the curve or the space available. We worked by eye with no templates allowed. I encourage my students to use templates where accurate spacing is necessary. There is no need to try the patience of students unnecessarily.

The edges and the centre of the Rose are Padded Satin Stitch. I am writing a tutorial on how to do this shortly. Like everything else, once you know how, it is easy.

It will be on my blogsite: Stitching Idyllic

Monday, January 14, 2013

Stitches Sampler

This was the first sampler stitched as a student at The Royal School of Needlework in 1951.

At 17 years plus a few days old, it was one huge undertaking to travel in and out of London each day and actually spend my time doing something that was both interesting and demanding. (Believe me, it was joy after attending what was a prestigious and appalling school.) My eyes were good and I was in 'the smaller the better stitches' phase in my life. As such, I now need a magnifying glass to identify some of these stitches.

This is particularly true of some of those in the darkest of the wool threads. There are some interesting Trellis Filling stitches but you can take a closer look at some of the details.

These samplers were mounted on masonite this being the only mounting board available at the time No one knew or understood anything about acidity and the conservation of fabrics and threads. On taking these samplers apart for acid-free remounting, I found that the fabric that wrapped across the cut edges of the masonite to be more discoloured than the main part. The white sheeting wrapping the board and underneath the sampler was brown as if plunged into tobacco smoke though no one in this house has smoked near them. In fact they have been behind glass for protection for many years.

The new mounting on acid free board covered with clean and freshly laundered white cotton underlay has been a huge amount of work. But I reckoned that if I did not do this, no one else would and that in another 50 years the condition of the fabric could be terrible. The threads have generally survived well though there was some minimal damage from moths that I was able to repair.

As you can see, there was not a lot of fabric available outside the design lines. After it came off the slate framed on which it was stitched, it was blocked. We used carpet tacks for this and you can see the holes and rust caused by this. I think that it would be almost impossible for a sampler such as this to exist without incurring damage from blocking, mounting and framing. It is sad to see this as I do remember, and remember well, what the samplers were like when pristinely new and not been 'processed for presentation'.

I hope you are enjoying and are interested in these Real Glimpses from the Past. Not too many stitchers from that era are still alive and I want to pass the views as well as the experience on before it is lost.

The next sampler to go online will be our second one. I am planning to include the directions on how to create immaculate Padded Satin Stitch. Like most of these techniques, it is not difficult once you know how.

Happy New Year.