Friday, February 1, 2013

Satin Stitch - Padded, Shaded and Stitch Rotated

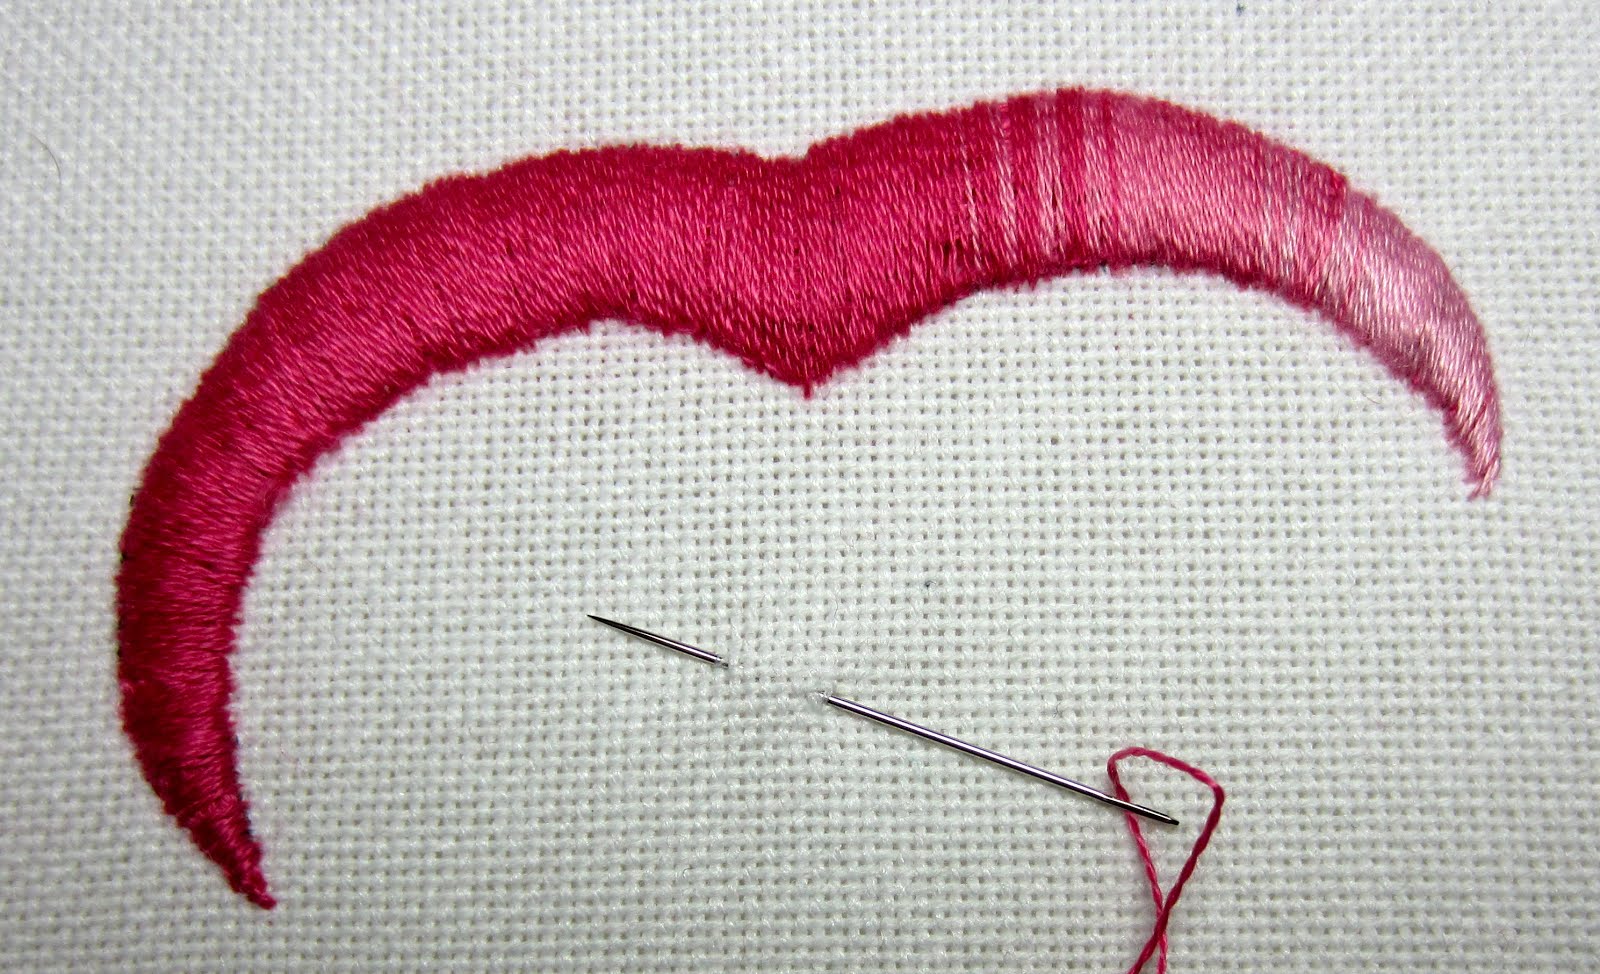
As I wished to include all the above features in this Tutorial, my design motif is unbalanced right and left sides. It is 3" across and 1/2" wide. This width is about as long as it is feasible to make Satin Stitches without them becoming unstable. 1/8" is about the narrowest or else it is too pokey.

The fabric I used is 28 count cotton Monaco by Charlescraft. The higher the thread count the easier it is to work this stitch and the result is better, too. I mounted it on a Grip-n-Stitch frame by Fabric Flair and am reviewing this new type of frame in a separate entry. It is essential that the fabric be really taut and mounted grain perfect when undertaking Satin Stitch.

1. Draw the shape on the linen, in this case it is cotton, using a pen that will make a very fine line.

2. I used DMC Floss and chose a range of thread colours that were close in shade. It is much harder to shade when there is a marked difference between the threads.

If the final layer of Satin Stitch is to be a silk thread, I would still use DMC Floss for padding for reasons of economy.

Preparation is vitally important
Unless this is perfect, the appearance of your final stage of Satin Stitching will not turn out as you had hoped. Do not short change yourself on this.

3. Using three threads of the floss, split stitch all round the motif on the marked line. As Mary Corbet has said, using two threads means that they divide when split stitched instead of behaving as split stitching. These stitches must be small i.e. 1/4" in length. Start and finish threads within the body of the motif. This outline needs to be as solid and immovable as the Great Wall of China. After just a few stitches, test this by going picky, picky with a finger nail to see that the line is solid and immovable. Reduce your stitch size if there is any give in this line of stitching.

4. Padding
All Satin Stitched projects need at least one layer of padding which is usually worked in long Split Stitches within the shape. This padding should cover all the space within the the outline. It will support the Satin Stitches and prevents them from collapsing into the middle of space. Totally unpadded Satin Stitch has a 'hollow' look to it.

Padded Satin Stitch has a raised look and needs three or more layers of padding stitches.
Use six strands of Floss for this. The first line is lengthwise. Note that it does not extend to the outline leaving a space. The second line is stitched crosswise. I used the palest of the colours so that this would be visible for you. Normally, I would use the same colour as the other layers. The third layer is also lengthwise and fills the entire space within the outline. Take the shortest route between padding stitches so that the reverse side does not also become padded,

Organize the padding layers so that the final one lies in the opposite direction to the Satin Stitches.

5. Satin Stitching
Make a decision on which edge of your stitched shape will be more noticeable. This is usually the outer edge of the petal of a flower or the edge which is better lit for the viewer. This is the dominant edge and the one that the needle goes down through the fabric.

The needle will come up on the less visibly noticeable edge which is usually towards the centre of the flower. Use one strand of thread only.

This may seem like an unnecessary amount of stitching but is quicker in the long term.
Two threads, or even three threads will twist and will not give attractive or professional results.
Try stitching with two threads just for the experience. You will find that you will have to separate those threads every stitch and it will make it slow. Slow and frustrating, actually.
One thread is the quick and easy way to go.
Also use the smallest needle you can manage to thread such as a Crewel size 9 or 10. This will help the ease and accuracy of the stitching though some Crewel 9 or 10 can be hard to thread. Bohin needles do not have this problem. The eyes are properly formed and much easier to thread.

Start with a knot (or not) and make a small waste stitch within the body of the padding.

In the centre of the motif bring the needle to the front on the less dominant side of the motif. Take it down to the back on the dominant side of the motif.

This is when your preparation will pay you dividends in ease of stitching and results.
Let the needle find the spot that is closest to that Great Wall of China and make sure that it goes through the fabric absolutely vertically.

And this, my fellow stitchers, is the secret to perfect Satin Stitch. Excellent preparation, stitch with one thread only and make sure that your needle entry and exit is always vertical.

If it is a straight shape, just continue until you reach the other end.

Shading
Shading is a question of getting organized as you move from one shade to the next. Thread another Crewel 9 or 10 needle with one thread of the next colour. Look at the photos to see how the colour change is achieved.
One stitch on the new colour, three of the old,
two stitches of the new, three of the old,
two stitches of the new, two of the old,
three stitches of the new, one of the old,
and then you will likely be ready to use all of the new colour.
These ratios are changeable as appropriate for your project.

Continue stitching maintaining the vertical and parallel orientation to the stitching, changing colours to achieve the shading you wish until you reach the end or the pointed end of the motif. I seem to have lost some of that perfect angling but you will not do that I am sure.

6. Points
If possible, organize your design motif and stitching plan so that the stitches at the point retain their vertical orientation. This creates a far more satisfactory result than trying to place tiny and short stitches across the point. There is nothing like a photo enlargement to show imperfections.

7. Rotating Satin Stitching
That means stitch direction which follows the curve of the motif. As you can see, in this shape, if the stitches remained vertical and parallel, they would become rather longer than the practical maximum of approximately 1/2". However, the stitches are remaining at right angles to the outer edge of the motif. The dominant outer curve is also considerable longer than the inner curve.

Here is how
Watch the shape and make an extra stitch every so often so that there are more stitches going down into the fabric on the outer edge than there are on the inner curve. Come up through the padding about halfway across the width of the motif and then go down on the outside edge as usual. The next stitch will be a normal stitch that covers the whole width of the motif. This second stitch will cover the start of the shorter stitch making it undetectable. That half way point can instead be 1/3 or 2/3 of the way across the width. This depends on the shape and curve of the motif.

Watch the shape and the stitch angles and add these extra stitches as needed but always have about three normal stitches between the shortened ones. I apologize for missing taking a photos of this and I am not computer literate enough to add an arrow as an indicator. I am also regretful that the photos are dark on one side.

The point at this end had to be stitched across with several really tiny stitches. I would have been wiser to continue the shape of this half of the motif in a gentle curve to the right which would then have let me finish it with longer stitches like the other end of the motif.
Leaf Shape with one layer of padding

This leaf is stitched in Perle 5.

1. Plan the shape and the stitch direction making sure that you will be able to complete both the rounded end and the point easily.
2. Split stitch on the line around the leaf using one thread of Perle 5 and ensuring that this line is solid and immovable (Great Wall of China). Use an appropriate sized Crewel needle which is the thinnest you are able to thread.
3. Using two threads of Perle 5, place long split stitches in the opposite direction to the planned Satin Stitch and fill the entire space within the leaf.

4. Decide on the designated primary and more visible edge of the leaf and arrange that your needle enter the fabric on that edge and come up through the fabric on the secondary edge. Remember to let the needle find the spot closest to the split stitch edging and that the needle enters and leaves the fabric at exact right angles to the fabric.

Start Satin Stitching in the centre and widest part of the leaf shape placing the stitches at right angles to the padding stitches. This is as you planned in the diagram.
Work towards the base of the leaf first making sure that the final stitch that completes the curve is short in length. This final stitch supports the previous longer one and prevents it 'falling off the curve'.

5. Continue vertically placed Satin Stitching until you reach the pointed tip. Place the final shortish stitch so that it forms the point. Take the needle down very close the the previous stitch so that this last entry point is not visible.

Padded Satin Stitch Small Circle

6. For a small shape, use three threads of DMC Floss to split stitch the outer line.
Use six threads of Floss to form a Double Cross Stitch or Quadruple Cross for the padding.

7. It is your choice to Satin Stitch with one thread of either DMC Floss or Perle 5.
Some circles, such as berries, become too small for the Perle 5 thread. Try Perle 8.

My circle is definitely not round. If you wish for an exact circle, use a template as suggested by Mary Corbet.

This completes this Tutorial.

Hope that you will enjoy and have success with Padded Satin Stitch.


Tuesday, January 22, 2013

Royal School of Needlework - Third Sampler - Applique and Couching

This piece was a pain to stitch. For starters, I did not like that hot pink linen fabric then and I continue to dislike it. It was the project where we learned, because we had to, how to stitch accurately and quickly.

The design was transferred onto the cream fabric by the prick, pounce and paint a very thin line with black water colour paint method. The pink and the cream fabric were both mounted onto a slate frame and the cream fabric was thoroughly basted in place.   Starting somewhere, probably near the base of the stem, small running stitches were made on the design lines along a small section. The fabric was trimmed away very close to the marked and stitched line. The couched thread was either 12 or 18 strands of DMC Floss (deliberately left slightly puffy) couched down with three threads. Whatever your spacing was between the first two stitches was what it had to be consistently throughout no matter the curve or the space available. We worked by eye with no templates allowed. I encourage my students to use templates where accurate spacing is necessary. There is no need to try the patience of students unnecessarily.

The edges and the centre of the Rose are Padded Satin Stitch. I am writing a tutorial on how to do this shortly. Like everything else, once you know how, it is easy.

It will be on my blogsite: Stitching Idyllic

Monday, January 14, 2013

Stitches Sampler

This was the first sampler stitched as a student at The Royal School of Needlework in 1951.

At 17 years plus a few days old, it was one huge undertaking to travel in and out of London each day and actually spend my time doing something that was both interesting and demanding. (Believe me, it was joy after attending what was a prestigious and appalling school.) My eyes were good and I was in 'the smaller the better stitches' phase in my life. As such, I now need a magnifying glass to identify some of these stitches.

This is particularly true of some of those in the darkest of the wool threads. There are some interesting Trellis Filling stitches but you can take a closer look at some of the details.

These samplers were mounted on masonite this being the only mounting board available at the time No one knew or understood anything about acidity and the conservation of fabrics and threads. On taking these samplers apart for acid-free remounting, I found that the fabric that wrapped across the cut edges of the masonite to be more discoloured than the main part. The white sheeting wrapping the board and underneath the sampler was brown as if plunged into tobacco smoke though no one in this house has smoked near them. In fact they have been behind glass for protection for many years.

The new mounting on acid free board covered with clean and freshly laundered white cotton underlay has been a huge amount of work. But I reckoned that if I did not do this, no one else would and that in another 50 years the condition of the fabric could be terrible. The threads have generally survived well though there was some minimal damage from moths that I was able to repair.

As you can see, there was not a lot of fabric available outside the design lines. After it came off the slate framed on which it was stitched, it was blocked. We used carpet tacks for this and you can see the holes and rust caused by this. I think that it would be almost impossible for a sampler such as this to exist without incurring damage from blocking, mounting and framing. It is sad to see this as I do remember, and remember well, what the samplers were like when pristinely new and not been 'processed for presentation'.

I hope you are enjoying and are interested in these Real Glimpses from the Past. Not too many stitchers from that era are still alive and I want to pass the views as well as the experience on before it is lost.

The next sampler to go online will be our second one. I am planning to include the directions on how to create immaculate Padded Satin Stitch. Like most of these techniques, it is not difficult once you know how.

Happy New Year.

Tuesday, December 4, 2012

Coral Stitch

Coral stitch is featured as an outline stitch in the Queen Anne corner of the Crewel Work Sampler stitched at the Royal School of Needlework during the early 1950s. I have never seen this stitch featured in a Stitch Dictionary which has motivated me to share it with you. Coral Knot stitch is often referred to as Coral Stitch but this is different.

Place your fabric in a hoop so that it is taut. DMC Perle 5 was used for this demonstration.

1. Work from right to left. Bring the thread to the front at the start of the line. Take the needle to the back above the line with the thread in a loop as shown.

2. Bring the needle back to the front an equal distance below the line and within the loop as shown.

3. Pull the thread vertically up towards your nose.

4. And here is the tricky bit. Adjust the length of the arms by pulling the thread away from you in a horizontal direction and then towards you horizontally until the length of the two arms of the stitch are equal.

Worked in the traditional manner this is a 'squared stitch' meaning that the space between the stitches is equal to the width of the stitch.

Also, it is preferable to use a thicker thread and decrease the size of 'the square' so that the black line is completely covered. If you look at the Queen Anne sampler, you will notice that the squares are so tight that it is hard to see the construction of the stitch.

Here are some examples of using the stitch in a more relaxed and contemporary manner. These are far easier to stitch than the traditional style where it really shows if the stitches are not an even size and spacing. I like the circular placement and think that it would nice alternative to Buttonhole Stitch and is much easier to control.


What will this stitch do for you?

Sunday, November 11, 2012

Queen Anne the fourth quarter. What is special or different about this?

Queen Anne (1702-1714) was the last of the Stuart monarchs. Although in poor health she was pregnant 17 times but only one child lived beyond infancy. Her great friend, Sarah Jennings, with whom she had a stormy relationship, married John Churchill. He had great military skill winning many battles in Europe including the Battle of Blenheim. A grateful nation created him the Duke of Marlborough and built Blenheim Palace for him. Located northwest of London and near Oxford, it is well worth a visit. Winston Churchill was born there.

Queen Anne's reign was noted for the development of the two party political system, the Union of England, Ireland and Scotland forming Great Britain among other achievements. It was a time of the building of mansions, private houses, lavish interior decoration and beautiful furniture. The furniture was smaller, lighter and more comfortable than previous styles; the cabriole leg (S shaped) is the most recognizably enduring part. This seems to be an appropriate accompaniment to the style of embroidery that we were told was current during Queen Anne's reign.

What we were told at the Royal School of Needlework was that silk threads from the Far East had become available triggering a whole different style of embroidery. These threads were not suited for portraying the Jacobean Tree of Life with all its fanciful and massive leaves, flowers, birds and beasts. Instead, linear and free form shapes better were better suited to the new style furniture and interior decorating. I do not think that the elements of this design represent anything or are symbolic of anything.

You will notice that the colours have become muted more like the Elizabethan colour scheme rather than the boldness of the Jacobeans. The parallel lines use negative space between the colours to enhance each one of them. The stitches used are puffy Couching, Long and Short Stitch, some Laid Work, and French Knots. The majority of the lines are worked in Coral Stitch which happens to be one of my very favourite stitches of all time. I have looked for it in books and never seen it anywhere. It does seem to be related to Coral Knot but is worked a little differently. No, it is not difficult. The effect is a light and open decorative line which works well both as a single outline and a spaced filling. I include the closeup so that you will be able to see it better. We stitched some lines in worsted wool such as the blue and green outer lines. The couching and long and short stitch are in Pearsall's Filoselle Embroidery Silk which is a 6-strand silk floss.

See also:
Sampler of crewel work stitches worked by Dorothea Nield, c.1930 in the Bridgeman Art Library. Creative Needlecraft by Lynette de Denne. Octopus Books Limited 1979 ISBN 1 85052 07. This excellent book is a good investment if you should be lucky enough to see it somewhere. Erica Wilson is bound to have it in her books though I am unable to tell you which one.

Notice the different design features and the different methods of stitching. Your comments are always welcome so please keep them coming. The next entry will be our first RSN sampler and, possibly, the second one also.

Sunday, October 21, 2012

Late Jacobean

The latter part of the 17th century is the period known as Late Jacobean. The third corner of this crewel work sampler was stitched while I was a student at the Royal School of Needlework a very long time ago, a teenager. This is where we learned to shade. The red and pink of the pomegranate is parallel shading. Parallel rows of stem stitch are worked starting from the outside. Notice how the colour change is achieved. The rest of the items are all long and short stitch and we started with the central part of the large leaf. By the time we got to the smaller, outer leaves we had more of an idea on how to do this difficult stitch. The leaves that shade from navy through green to yellow are one inch in length for the smallest, and one and a half inches long for the leaves at the top of the panel. The method is 'stitching to a vein without a vein'. Notice the sharp points and crisp edges to these leaves. I did a good job of those and yes, there are technical tricks to achieve this.

Researching this design, the pomegranate is symbolic for fertility and abundance though there are different meanings dependent on the culture or religion.

We were told that the blue rose indicated the joining of the Houses of Lancaster and York which concluded the Wars of the Roses. These civil wars in the 15th century (described as long, repetitive and destructive) were between the Plantagenets (white roses) and the Tudors (red roses) and the politics were complicated. A combination of sick and incompetent rulers created widespread unrest with families divided and fighting each other.

Henry Tudor (became Henry V11), won the final battle which was horrific but ended the conflict. He was the father of Henry V111 and grandfather of Queen Elizabeth 1. As the Early Jacobean period occurred after the reign of Elizabeth, this blue rose indicates a period that was already history. The above stylised version of the uniting of these warring factions is really more congruent. I, personally, think that the blue rose is just a blue rose with no historical significance.

Unfortunately, the water damage from steaming is clearly visible in this quarter of the sampler.

I remain eager to hear your comments and ideas on the significance of these motifs. It would be great to be able to put more information into the provenance.

You can also go to annbernard.com to see more recent stitching.

Monday, October 8, 2012

Elizabethan Post Script

Before getting into the Jacobean Embroideries, I thought you would like to see this piece of embroidery. It is labelled as neo-crewel period dated 1910. Courtesy of H.E. Kiewe. English Crewel Designs by Mary Eirwen Jones 1974 1SBN 1-688-00288-9. It makes me curious, more and more curious.


Early Jacobean

The Jacobean period refers to the 17th century when the Stuarts, starting with James I and Charles I and II, ruled. They were the Kings immediately after Queen Elizabeth 1. There was a break in the Stuart line for Oliver Cromwell. It was an ornate period with lavish clothing and wonderful architecture. Early Jacobean specifically refers to the reign of James 1 in the first quarter of the century. The East India Company was at that time importing palampores into England which greatly influenced English decorative arts.

Palampores, hand-painted (stencilled) cotton fabrics from India, were influential in developing the traditional crewel work designs such as the Hindu Tree of Life pattern. Favourite embroidery motifs included exotic animals, resplendent birds, large ornate leaves and fantastical flowers. The timeless appeal of the Jacobean designs means that these motifs and layout continue to be used today though many of us now seek to arrange them in non-traditional ways. Embroidery was done on linen or twill fabric using wool yarn in bright colours. Many household items such as large wall hangings and bed curtains as well as cushions and pillows were decorated with Jacobean embroidery. They can be seen in museums and are illustrated in many books.

This is the second of the four corners on this Crewel Work sampler. In terms of technique, it is an exercise in Block Shading. This is not difficult to do but it is advisable to know how it is done to reduce unnecessary problems. We started with the green areas and progressed to the large turquoise leaf. The learning process is fairly obvious if you look closely. I love the pink and grey motif in the upper right corner. I also like how the green of the main leaf forms the stem of the turquoise leaf giving the whole design unity. The oddity in the piece is the bright blue in the lower left. It is not a mistake or a repair. We were given this colour to use in that position. I remember questioning it. These being the postwar years and a lack of replacement materials, I think that RSN was running out of the right shades of wool threads though it does add a little zing to the composition.

The dark brown area is Long and Short Stitch. We were told that Block Shading was a technique that was used before the development of Long and Short Stitch. I have no idea whether this is correct or not. And it bugs me not to know and understand the progression of stitching history except in reference to major shifts and developments. I hope that there is someone who knows the answers as I will be gratefully eager to hear them. Unfortunately, in this corner of the sampler the water damage from steaming is obvious. I greatly regret this as it is otherwise in excellent condition.

Any thoughts or suggestions you have will be greatly appreciated.

The next corner, Late Jacobean shows a progression in technique and a totally different design.